Wednesday, March 2, 2011

Advanced Basing Techniques

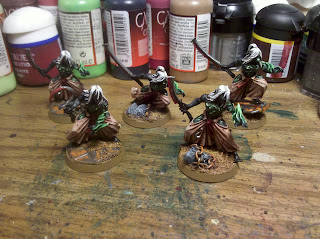
Basing can make or break a model. Even if your painting skills rank only a "meh", complete and uniform basing can make your army really pop. But if you're looking to make your army look super-sharp, complex or creative basing can be one of the most important steps.

I recommend devising a theme for your army. For example, I thought it'd be fun for my Dark Eldar to be assaulting a Mechanicum Forge World. If you've read Graham McNeil's "Mechanicum" or Dan Abnett's "Titanicus" then you know what a Forge World looks like in my mind's eye: dusty, gritty, utterly polluted, littered with scrap machinery and junk parts left to rust for eternity. My Dark Eldar would be raiding this Forge World to steal items and technology to sell to other races or to use for themselves, as well as grab a few Tech-Adepts and menials for the torture tables! Therefore, they'd be blowing holes in buildings and assaulting through to nab all the cool stuff. I itemized what I wanted to do, and wrote down how to do it.

1: Dusty/Gritty: The obvious starting point would be gravel/sand glued to the base, what really mattered was the color choice. The sand would be painted GW Vomit Brown and then dry-brushed GW Plague Brown, with a few spots of dry-brushed GW Bleached Bone. I also added stones and boulders buried in the sand, using my old standby of cork glued to the base before the sand. Here's the type of cork I use: Linky-link!

2: Junk: I glue anything to the base that looks even remotely mechanical. My favorite are lock washers because they look like cogs or gears. Plastruct and Evergreen make a variety of useful types of plasticard rod such as I-beams or ladders, and all sizes of round tubing. GW bitz are also super-useful. I've been using the inside gubbinz of Space Marine Drop Pods, (because I don't use them on the inside of the Drop Pods, I just glue the SoB's shut!) because they can be easily cut to look like ubiquitous machine parts. Searchlights, jerry cans, ammo bins, IG stowage, grating cut from SM Razorback hatches, exhaust ports, anything! A $20 box of Cities of Death terrain can supply an entire army's worth of basing material! Just start digging through your bitz bins until you can find something that could be mistaken for machinery. Even just brass rod bent at rounded 90 degree angles can simulate laid wiring.

3: Buildings: Of course I can't construct buildings on bases, but I can hint at them. Remember, the miniature is a little display of another reality plucked and placed onto a base. It's perfectly fine to have just a portion of something showing on a model's base. Once again, I return to Evergreen and Plastruct for plasticard sheets with diamond plate patterns, tile patterns, corrugated sheet patterns and siding patterns. I like Evergreen's 1/4" Tile pattern plasticard because it has a very defined cut, snaps easily into workable pieces, and looks just like a tiled or paneled floor! I add pieces of standard plasticard sheeting to simulate a broken wall, just leave on edge flat to glue to the base where the tile stops, and rag up the other edge with snips or a knife.

4: Pollution: This mostly came down to choice of paint. Having "oil" leaking from pipes or into drainage ditches by layering on green, brown and black washes to flavor. Most of the metal things were painted with splotches of rust, using a progression of GW Bestial Brown, VGC Hot Orange, then VGC Fiery Orange in a stippling pattern.

I suggest gathering your materials before you start your project, and make sure you have enough for the whole army. Take an hour and go to your local hardware store and check out their supply of washers and nuts, something is sure to catch your fancy. If they do window screen repair, ask for some scraps of aluminum screen, it makes great decking and grilles. I bought a piece today from Grieve's that was 12"x 24", it cost me $1.10, and it's more than I'll ever use. Stop by Hobby Lobby or Michael's and just look for doodads. Most of the stuff can be picked up cheap, and it's dead-useful.

So, I'll leave you with some shots of my DE bases, and I'll be back next time with some more basing techniques ,or whatever I damn well feel like!


Thursday, February 24, 2011

Armageddon Strike Force Alpha: 1,500 Point RTT List


Hey all, since a few other people have been kind enough to post their army lists for the upcoming RTT at our local game store, I thought I'd do the same.

Right around the time Ian started fleshing out his Death Company (that is to say, when the Storm Raven came out), I read an article in White Dwarf about the Armageddon campaign. Now, I've always loved the fluff behind the Second and Third Wars, but I'd never had an army that I liked and that had participated in the war. After reading through the new Blood Angel book and seeing how awesome their new models were, I was sold.

I wanted to make a rapid strike force, a group that would identify Ork threats, zoom in, do their job and then GTFO; kinda First Recon with Air Support. So I settled on Scouts with Camo Cloaks, Speeders and a Storm Raven full of Sternguard vets that count as "Death Watch".

As chance had it, there was a 1,500-point RTT coming up (March 12th). I thought this would be the perfect opportunity to début the army.

Here is the list thus far:

(NOTE: This is not supposed to be competitive, just a fun little idea. Though I realize the amount of Ass. Cannons may insinuate otherwise...)

1 x "Death Watch" Librarian with Fear of Darkness and Shield of Sanguinius
7 x "Death Watch" Sternguard Veterans w/ 2 Combi-Flamers
1 x Furioso Dread w/ Frag Cannon, Melta and Extra Armor
1 x Storm Raven with Twin-Linked Assault Cannons, Twin-Linked Multi Meltas, Hurricane Bolters and Extra Armor

5 x Scouts w Camo Cloaks: 4 x Bolters, 1 x Heavy Bolter and a Locator Beacon

2 x Land Speeders with Assault Cannon and Multi Melta

I'm thinking about dropping the Furioso as it doesn't really match the whole "fast" feel, but I have no idea what I would sub in for the same points...

I should have some pictures up soon, along with a little Scout Tutorial.

Lemme know what you guys think!

-Aaroon

Tuesday, February 22, 2011

BADCo, til the day I die...


Previously, I had mentioned that I was building an all-Death Company army. I have dubbed my 2000 point list "the BADCo." (read as "Bad Company", stands for "Blood Angels Death Company") So for this installment of SGS I thought I'd break down the army list.

The impetus for the BADCo was when I was reading the Blood Angel codex a while back and stumbled upon the facts that all Death Company models have the Relentless USR, and a Death Company model may have both a Boltgun and a Jump Pack. This combination is unprecedented in my eight years of playing 40k. The persistent little seed of an idea took root, and I found myself continuing to come back to Army Builder, trying to build an army around the idea. I was enamored with the idea of a unit being able to lay down considerable suppressing fire, bouncing back and forth, balancing that 12" Rapid-fire, and choosing where and when they'd get into close combat.

After several unsuccessful attempts, I had found out that DCo. with jump packs were just too darn expensive to not be applied to close combat. 35 points per model, needing at least 10 models, preferably 15 to get the volume of fire I was looking for. Plus a Powerfist, two if the squad was 15 strong, to help dig their way out of CC. Then you're looking at investing in a Jump Chaplain for the twin-linked To-hit/To-wound to make up for the lack of that extra attack. Not to mention having to take Astorath, who costs almost as much as a Land Raider, just to unlock the 0-1 restriction on DCo. All in all, I figured I was spending too many points on a gimmick that would be ultimately less effective than just shoving DCo. into close combat.

But that idea tenaciously stuck around, clinging to the cliffside I had shoved it off of. I continued to tweak the list, and finally found something I was happy with, here it is:

-Astorath
-Death Company w/ Jump Pack (12x)
-5x Bolt Pistol/Chainsword
-3x Bolt Pistol/Power Weapon
-2x Infernus Pistol/Power Weapon
-2x Bolter/Power Fist

-Chaplain in Power Armor (Bolt Pistol/Crozius)
-Death Company (9x)
-8x Bolter/Chainsword
-1x Bolter/Power Fist
-Drop Pod

-Chaplain in Power Armor (Bolt Pistol/Crozius)
-Death Company (9x)
-8x Bolter/Chainsword
-1x Bolter/Power Fist
-Drop Pod

-Death Company Dreadnought
-Blood Talons
-Heavy Flamer
-Meltagun
-Drop Pod

-Death Company Dreadnought
-Blood Talons
-Heavy Flamer
-Meltagun
-Drop Pod

-Death Company Dreadnought
-Blood Fists
-Heavy Flamer
-Meltagun
-Magna-Grapple
-Drop Pod

Granted, the list is a lot spammier than I like, lots of duplication. But when you're limiting yourself to two entries in an entire codex, things get a little redundant. The plan is to hold everything in reserve, decide if Dreadnoughts or Footsloggers will do best first turn, send them in. Astorath and Company Descent of Angels in at their convenience. The cheap Chaplains add another four Power Weapon attacks and allows the DCo. to re-roll To-Hits and To-Wounds, making for 18 Bolter rounds, plus 24 S5 attacks and 3 P-fist attacks, all of which are twin-linked twice, essentially. And you save almost 150 points by putting the Boltgun DCo. in Drop Pods instead of giving them Jump Packs.

Food for thought, lemme know what you think.
-Ian

Sunday, February 20, 2011

De-Emoed Astorath


Hey all!

Just quick update for all you faithful SGS viewers. I'm here with an Astorath "Counts-as" model for my all-Death Company army. I really don't care for the Astorath model, so I tried to come up with an appropriate substitute. When I do "counts-as" models or armies, I strive to make sure that when playing games, my opponent will be able to immediately associate my "counts-as" model with its intended rules.

I read the fluff, and kept in mind that Astorath's job is to mercy-kill Death Company before they go so insane as to become a danger to their fellow battle-brothers. He also has a two-handed executioner's axe. I figured that a Grim Reaper, with its visage and scythe personified this role perfectly. Astorath also has a jump pack, so I had to make sure I included that.

The starting point for the model was the new Lemartes figure, but including a two-handed weapon was stumping me for a bit. GW doesn't produce a whole lot of figures that are actually wielding a weapon two-handedly that wouldn't add another $15 to the overall cost of the conversion, (my first thought was Typhus, but I didn't want to pay $25 to get his Manreaper). I searched through my Marines bits box and found the new Blood Angel Death Company Thunder Hammer bits (right-handed) and the Space Wolf Pack Frost Blade bits (left-handed). Based on Lemartes' posture, the Frost Blade looked best. I cut the Frost Blade axe head off and the handle below the right hand off. Two lengths of shaft were added to both sides from an old "Custodes Halberd" bolter/halberd/force weapon bit. The bottom of the Frost Blade was reattached to the bottom of the weapon shaft, and the power core of the BADCo Thunder Hammer bit.

The trickiest part was the scythe blade, which was made from scratch from plasticard. It took a long while to get the shape right, and even longer to get the blade part smoothed down. Some thin wire and dots of plasticard rod were added for the power weapon "nodes", the power cable from the BADCo Thunder Hammer arm was attached to the back, a top spike from the BA Librarian Dreadnought Force Weapon, two of the BA wing/blood drop icons from the BADCo box and a few purity seals.

All in all, it came out like this:


Be back soon!
-Ian

Wednesday, January 19, 2011

Reaver Jetbikes

Here's a small tutorial on how to paint Dark Eldar. The theory behind it is that the DE use different shades black that only really reflect color on the edges. As such, we'll only be putting color on the edges.

First step after assembly and priming is to mix VGC Chaos Black with water in a 1:1 ratio, then apply this over all the areas that will be predominantly black, such as the armored carapace. This is done because primer black tends to less vibrant than the paint-on acrylic black and Chaos Black will help the model's overall tone and aid in blending.

Next you'll block out all of the metal areas in GW Boltgun Metal, after the areas are thoroughly dry you'll wash with GW Badab Black. Clean up any areas where you strayed onto the black areas with VGC Chaos Black.

Our next step is to thin out some GW Necron Abyss, just enough to help it flow. We'll then take the color and rim the edges of all the carapace. Remember, two thin coats are ALWAYS better than one thick coat, especially for this style of painting. One of the reasons why this style is easier than most for blending is because you keep your paint thin, using the paint's translucency and allowing the previous layer to show through, enhancing the color progression and blending. The width of the line you put on the edge of the carapace depends on how vibrant you want the overall effect to be. If you want your carapace to look like a dark depthless black with the faintest of color, use thin lines. If you want the color to be more apparent, use thicker lines.


Next up is VGC Imperial Blue. Use the same method and go over the same areas. Because we already have the Necron Abyss base coat down, this step should go quicker and you should have less areas where you'll need to go back over twice.


The last two steps require more discretion. We'll be edging again with VGC Magic Blue, but you'll want to keep it VERY thin, remembering to allow the previous layer to show through. Here you'll have to decide which areas to highlight. On mine, I chose to highlight the "upper" areas, as if the light source for the highlights were directly above the model. take a close look at the pictures and you'll see what I mean. You have to imagine how light would reflect off the surface of the model.


The final step is done with VGC Ice Blue. This will be done very sparingly and only on the corners.


So, that's the hard part done! As long as you've got a good color progression, you can use this technique for almost any color. Here are a few recipes for those of you who don't want to do just blue:

RED
VMC Burnt Cadmium Red
VMC Burnt Cadmium Red + VMC Carmine Red (1:1)
VMC Carmine Red
VGC Bloody Red
VGC Bloody Red + VGC Fiery Orange (2:1)

GREEN
GW Orkhide Shade
VGC Scurvy Green
VGC Jade Green
VGC Foul Green

PURPLE
VGC Chaos Black + VGC Liche Purple (1:2)
VGC Liche Purple
VGC Warlock Purple
VGC Warlock + VGC Tentacle Pink (1:1)

DARK LEATHER
VGC Scorched Brown
VGC Scorched Brown + VGC Dark Flesh (1:1)
VGC Dark Flesh
VGC Dark Flesh + VGC Bleached Bone (2:1)

MATTE BLACK
VMC German Grey
GW Adeptus Battlegrey
VGC Cold Grey
VGC Stonewall Grey

Wednesday, January 5, 2011

Incubi


Hey all! Sorry for the lack of updates, but here is a small update of some of the Dark Eldar stuff I've been working on. As I said previously, my DE army will consist of things I like to paint and things people don't often use, so Incubi were an obvious next step for me. I've decided to do the DE like I did my Space Marine army, lots of different schemes culminating into one hodge-podge force of badassitude.

INCUBI!


Soon to come: Reaver jetbikes, Ravagers and Malifaux!

Thursday, December 2, 2010

Do you like my Hammer Pants? I made them out of people. - Dark Eldar Mandrakes

Hi all! I've decided to jump on the Dark Eldar band wagon and start that army, (the models are just too cool!) I don't want to do anything super-competitive, so I'm using all the really cool-looking but sort of useless units. I started out with the Mandrakes.

Sorry about the color wash-out, seems like the camera wasn't playing nice with the lamp.

Enjoy:

Thursday, November 4, 2010

Dark Eldar Wracks


Hey everyone! Sorry for the egregious lack of updates. We’ve been super busy with commissions and the Iron Builder competition that Ian mentioned a few posts back. To placate what few followers we have, I present some Dark Eldar Wracks. I know they’re not perfect, but they’ll be good enough for my purposes.


Components:
Empire Flagellant Bodies and Arms
Chaos Warrior Heads (sans horns)
Vampire Count Ghoul Bodies (for Liquifiers)
Kroot Arms and Shoulder Pads (for Liquifiers)
Skaven Hand Weapons (for Spikey Bits)
Necron Flayed One Hands (for Leader’s Scissor Hands)
Leftover Renegade Ogryn Bit (for Leader’s Toxin Injector)
Diodes (for Toxin Injectors)

Construction is fairly straight forward. The Leader and Liquifier guns still need hoses and such attached to them.

The Diodes can be found at nearly any RadioShack (25 for $3). Basically, you just cut the wire off of one side and trim it down on the other; then you can just plug it into a pre-drill hole in the model’s back.


Comments and criticism welcome, but these guys have to be painted by Saturday evening for a competition, so they won’t be getting changed. However, all good ideas will go towards the second batch I’ll have to make.

Thursday, October 7, 2010

Machinations of an Unfettered Mind - Ironclad Dreadnought Conversion

So yeah, I was bored of Slaanesh for the evening and decided to take an Assault on Black Reach Dreadnought I'd saved from the bargain-bin and try to salvage it into something cooler. So with several bits bins, some plasticard and some Green Stuff, I've come up with this little guy. I recently finished up James Swallow's Nemesis book, and throughout it the author gives the characters gizmos and doodads that are compact and rather clever, much unlike the ornately baroque and unsubtle grim-dark devices we're used to. I used that take on 40k technology when I was building my new mechanical buddy. He's not festooned with purity seals, he has no filigree that would take artificers years to repair if a child's errant rubber ball ricocheted into him, his Hunter-Killer missiles aren't launching from the butts of golden cherubs.

Enjoy:


Seismic Hammer Close-up

Wednesday, October 6, 2010

Sex, Drugs and Rock 'n' Roll - Iron Builder III Army Project

With the newest Iron Builder kicking off at the KrystalKeep, I've decided to do a Slaanesh-themed daemon army. Here's a couple of teaser shots for all you post-starved followers:

Very much incomplete Daemonette Unit No. 1


Fiends of Slaanesh, SGS Style!


The two on the flanks actually have bigger lamprey-esque maws now,
made from Green Stuff.

Most of the rest of the army

Here are a few answers to questions people will undoubtedly be asking, I've tried to arrange the order to simulate a conversation:

1: Yes, Iron Builder is still a 40k event.
2: Yes, I know they're on square bases.
3: Because it doesn't matter for 40k if models are on square or round bases.
4: It's so I can use them for WH Fantasy also.
5: The cobblestone is made from 1/4" gridded plasticard, tutorial to follow soon.
6: Because the pewter GW Fiends of Slaanesh look terrible.
7: Chaos Spawn and Ravener tails and a ton of Green Stuff.
8: No, I'm not doing a tutorial for them.
9: Because it's self-explanatory.
10: Just get the kits and mix up the parts! Shit! Get off my case, spaz!

For those of you that are unfamiliar with what Iron Builder is, EDUCATE THYSELF!